7 Wire Honeywell Thermostat Wiring Diagram: Explained
Honeywell thermostats are renowned for their reliability and advanced features, making them a popular choice for homeowners looking to regulate their indoor climate effectively.
However, understanding the wiring diagram for a 7-wire Honeywell thermostat is essential for proper installation and functionality.
7 Wire Honeywell Thermostat Wiring Diagram, In this article, we’ll delve into the intricacies of Honeywell thermostat wiring, covering everything from wire color codes to step-by-step wiring instructions.
Introduction to Honeywell Thermostats
Honeywell is a leading brand in the thermostat industry, known for producing high-quality devices that offer precise temperature control and energy efficiency.
Before delving into the wiring details, let’s briefly discuss the importance of proper thermostat wiring.
Understanding Thermostat Wiring Basics
Proper wiring is crucial for the seamless operation of a thermostat. It ensures that the thermostat communicates effectively with the heating, ventilation, and air conditioning (HVAC) system, allowing you to maintain a comfortable indoor environment. The basic components of a thermostat include terminals, wires, and a control interface.
Types of Honeywell Thermostats
Honeywell offers a range of thermostats catering to different needs. You can choose between programmable and non-programmable thermostats based on your preferences for scheduling temperature adjustments. Additionally, Honeywell thermostats are available in digital and analog variants, each with its unique features and benefits.
7 Wire Honeywell Thermostat Wiring Diagram
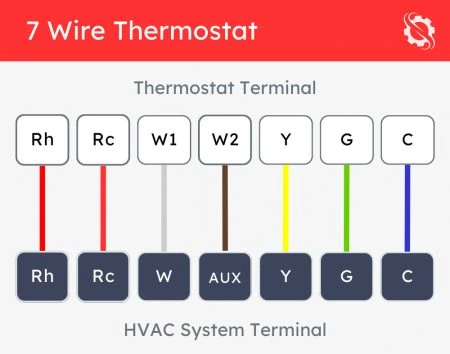
The 7-wire Honeywell thermostat wiring diagram outlines the connections between the thermostat terminals and the HVAC system.
Understanding wire color codes is crucial, as they indicate the function of each wire. Common wire colors include red (power), white (heat), yellow (cooling), green (fan), and more.
Here is a basic 7-wire Honeywell thermostat wiring diagram:
- Red (R) wire goes to the R terminal for power.
- White (W) wire connects to the W terminal for heating.
- Yellow (Y) wire goes to the Y terminal for cooling.
- Green (G) wire connects to the G terminal for the fan.
- Blue (C) wire (if present) connects to the C terminal for the common wire.
- Orange (O/B) wire goes to the O/B terminal for heat pump operation.
- Black (Aux/E) wire connects to the Aux or E terminal for auxiliary or emergency heat.
Step-by-Step Guide to Wiring a Honeywell Thermostat
To wire a Honeywell thermostat correctly, follow these steps:
- Turn off the power to the HVAC system.
- Remove the old thermostat and label the wires.
- Identify the terminal letters on the new thermostat.
- Connect wires to their corresponding terminals based on the wiring diagram.
- Securely mount the thermostat on the wall and restore power.
Troubleshooting Common Wiring Issues
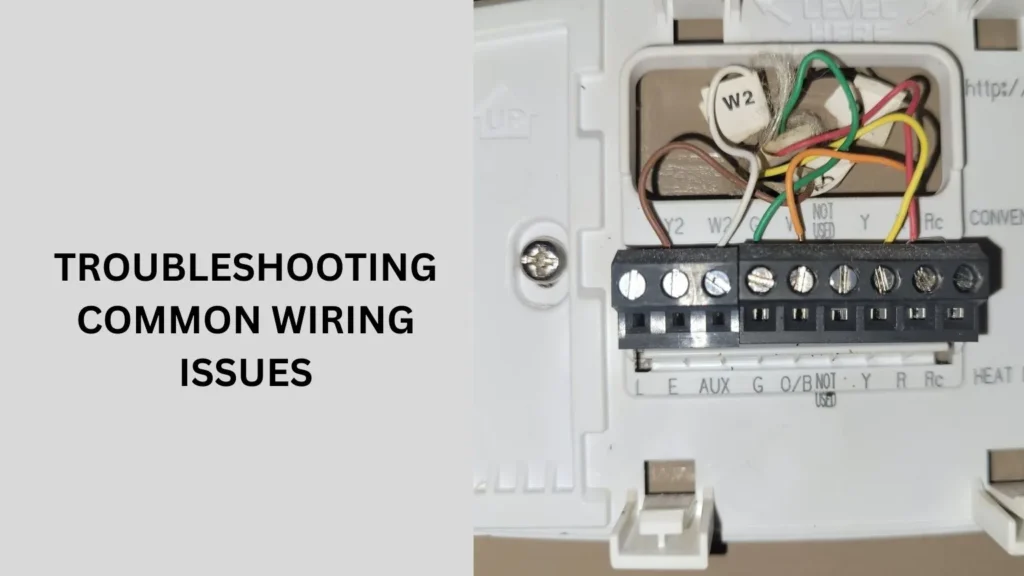
Wiring a thermostat can sometimes be tricky, and even a small mistake can lead to improper functioning or complete system failure. Here, we’ll address some common wiring issues and how to troubleshoot them.
Incorrect Wiring Connections
One of the most common issues arises from incorrect wiring connections. This can happen if the wires are not connected to their corresponding terminals or if the labels on the wires are mismatched.
Here’s how to address this issue:
- Double-Check Connections: Review the wiring diagram and ensure each wire is connected to the correct terminal. For instance, the red wire should connect to the ‘R’ terminal, the white wire to the ‘W’ terminal, and so on.
- Verify Wire Labels: If you labeled the wires when removing the old thermostat, ensure the labels are accurate. Cross-reference them with the wiring diagram to confirm.
- Inspect for Loose Wires: Sometimes, wires may not be securely attached to the terminals. Make sure all connections are tight and secure.
Compatibility Issues with HVAC Systems
Not all thermostats are compatible with every HVAC system. If your Honeywell thermostat is not functioning correctly, it could be due to compatibility issues.
Here’s how to troubleshoot:
- Check Compatibility: Consult the Honeywell thermostat manual to ensure your HVAC system is compatible. You can also use Honeywell’s online compatibility tool for a quick check.
- Consult HVAC Specifications: Refer to your HVAC system’s manual to understand its requirements and ensure the thermostat meets these specifications.
- Seek Professional Help: If you’re unsure about compatibility, consider reaching out to a professional HVAC technician for guidance.
Thermostat Not Responding
If your thermostat doesn’t respond or seems dead, it could be due to a power issue or faulty wiring. Here’s how to troubleshoot:
- Check Power Supply: Ensure the HVAC system’s power is turned on. Check the circuit breaker and make sure it hasn’t tripped.
- Inspect Power Wire (R Wire): The red wire supplies power to the thermostat. Ensure it is securely connected to the ‘R’ terminal and has no breaks or damages.
- Replace Batteries: If your thermostat uses batteries, try replacing them to see if that resolves the issue.
Heating or Cooling Not Activating
If your thermostat seems to be working but the heating or cooling system doesn’t activate, it could be due to incorrect wiring or settings:
- Verify Heating/Cooling Wires: Ensure the white wire (heating) is connected to the ‘W’ terminal and the yellow wire (cooling) to the ‘Y’ terminal.
- Check System Settings: Make sure your thermostat is set to the correct mode (heating or cooling) and the temperature settings are appropriate.
- Reset the System: Sometimes, a simple reset can resolve the issue. Follow the manual’s instructions to reset your thermostat.
Fan Not Working
If the fan doesn’t operate when it should, the issue might be with the green wire or the fan settings:
- Inspect Fan Wire (G Wire): Ensure the green wire is securely connected to the ‘G’ terminal.
- Check Fan Settings: Verify the thermostat settings to ensure the fan is set to ‘auto’ or ‘on’ as needed.
- Test the Fan: Manually test the fan setting on the thermostat to see if it activates.
Benefits of Using a Honeywell Thermostat
Investing in a Honeywell thermostat offers numerous benefits, including:
- Energy efficiency through programmable temperature settings.
- Advanced features such as Wi-Fi connectivity and voice control.
- Customization options for personalized comfort settings.
People also ask
What are the 7 wires on a thermostat?
The seven wires commonly found on a thermostat are:
Red (R): Power wire, supplies 24 volts to the thermostat.
White (W): Heating wire, activates the heating system.
Yellow (Y): Cooling wire, activates the cooling system.
Green (G): Fan wire, controls the fan.
Blue (C): Common wire, completes the circuit for some thermostats.
Orange (O/B): Heat pump wire, switches between heating and cooling modes.
Black (Aux/E): Auxiliary or emergency heat wire, used in heat pump systems for additional heating.
What color wires go where on a Honeywell thermostat?
On a Honeywell thermostat, the typical color wires go to these terminals:
Red (R): Power, connects to the R terminal
White (W): Heating, connects to the W terminal
Yellow (Y): Cooling, connects to the Y terminal
Green (G): Fan, connects to the G terminal
Blue (C): Common, connects to the C terminal
Orange (O/B): The heat pump, connects to the O/B terminal
Black (Aux/E): Auxiliary or emergency heat, connects to the Aux or E terminal
Do I need a jumper between R and RC?
If your HVAC system uses a single transformer for both heating and cooling, you need a jumper between R and RC.
If your system has separate transformers, connect the R wire to RH and the RC wire to RC, with no jumper needed.
Where does the white wire go on a Honeywell?
The white wire on a Honeywell thermostat typically connects to the W terminal, which controls the heating system.
Conclusion
In conclusion, a 7 Wire Honeywell Thermostat Wiring Diagram provides precise temperature control and energy-saving features.
Proper wiring and installation are crucial for optimal performance. Refer to the wiring diagram and follow the step-by-step guide for a seamless installation experience.
